
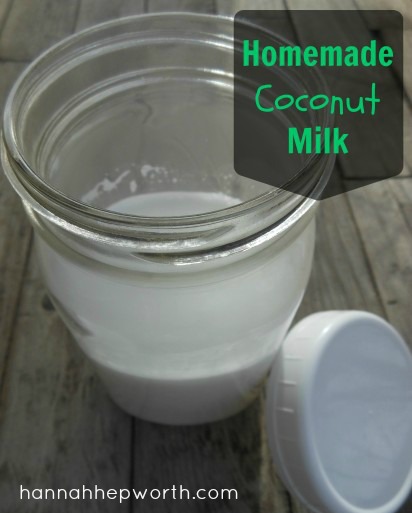
Making homemade coconut milk couldn’t be more easy. It’s perfect for those who have a difficult time with dairy or who are looking to switch it up. I love using this coconut milk in smoothies. I’ve also been experimenting with making coconut milk kefir which has turned out wonderful. You can also use it in this yummy slow cooker chicken curry recipe. It’s also a lot cheaper to make your own coconut milk than to buy it by the can. A can of nice coconut milk without additives can be over 3 dollars.
I figured that when making kefir, it’s actually cheaper to use homemade coconut milk than raw cow’s milk. You can buy shredded coconut from Azure Standard for $10.00 for 5 pounds. In 5 pounds you get about 25 cups of coconut. 1 cup of coconut makes 2 cups of coconut milk. From the 5 pound bag you would get about 50 cups of coconut milk which is 3.125 gallons which comes to $3.20 per gallon. Raw milk in my neck of the woods is about $7.00 so that is a considerable savings. That is if you can get dried shredded coconut for $2.00 a pound. At my local Winco I can get it in bulk for about $3.00 a pound which still would be cheaper than buying raw milk.
Either way coconut milk is delicious, you can use it in any recipe as a milk substitute, over this homemade granola, in smoothies or plain. Not only is coconut milk yummy but it’s also very nutritious. “Coconut milk contains lauric acid, antimicrobial lipids and capric acid, which have antibacterial, antifungal and antiviral properties. The body converts lauric acid into monolaurin, which may fight the viruses and bacteria that cause herpes, influenza and even HIV. Coconut milk is highly nutritious when ingested, and these nutrients may help fortify and condition skin and hair as well. The fatty acids in coconut milk are a natural antiseptic and may help treat dandruff, skin infections, wounds and dry, itchy skin. Furthermore, the high fatty acid content in coconut milk serves as a natural moisturizer for healthy skin and may help repair wrinkles and sagging in aging skin.” Sweet, what’s not to love? Let me know how else you use coconut milk in the comments below.
Source: Livestrong.com
Homemade Coconut Milk 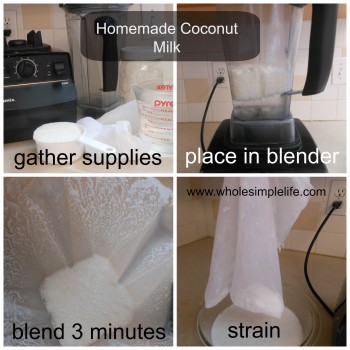
1 c. shredded dried coconut
2 c. water
Blender (I like this one)
nut milk bag or fine mesh strainer & spatula
Container to store
Directions:
1. Place coconut and water into a blender.
2. Blend on high for about 2 minutes.
3. Strain coconut bits to create a smoother milk, you can use a nut milk bag or a fine mesh strainer and push the coconut with a spatula to squeeze out the liquid.
4. Store in an airtight container in the fridge for up to a week, the cream will separate to the top so just mix it up before you use it.
*You can save the pulp of the coconut if you’d like, I put mine in a zip top bag in the freezer, I have heard you can use it to make your own coconut flour, so I will be experimenting with that in the future.


This is interesting – thanks for sharing on Thank Goodness it’s Monday. I love coconut, but have never made the milk. I thought the juice inside a fresh coconut was considered coconut milk? Or is that just a juice? How would I make coconut milk starting from a fresh coconut? Just puree the flesh and juice together?
Coconut milk is delicious. The juice or “water” inside a fresh coconut is considered coconut water a little different than the milk. I’m not sure if you could use a fresh coconut to make milk. I have a hard time just cutting into a fresh coconut to get the water out I’m not sure how easy it would be to scrape out the flesh, but I’m sure once you got the flesh out you could blend it up just the same. For me I think buying the dried shredded coconut is a bit easier and cheaper but that would be a fun experiment. Thanks for stopping by I’m heading over to http://ouroneacrefarm.com to check it out.
It’s much tastier if you let it soak at room temp for 4-8 hours. (no more than 6 if the room if very warm). Then let it sit over night and remove the fat layer. Your left with smooth, flavorful milk that will no longer separate. Save the fat to use in place of heavy cream or to make homemade dairy free whipped cream or frosting. And yes, you can dry the pulp out in the oven for several hours and then blend in a food processor or vitamix to make flour. 🙂 (I make it quite often)
That’s a good idea, I’ve never thought of soaking the coconut but I bet it would make a smoother milk. Thanks for the tip!
Will definitely be trying this. Can you really make coconut flour with the pulp? The only way i can get coconut flour here is on-line and it’s very expensive and then there is the postage…
Yes, you can, you can dehydrate it first, then grind it up in your blender once it’s nice and dry. I know that coconut flour varies by brand and is a little temperamental with baking, some brands absorb more liquid that others, so no guarantees, I’ll let you know when I try it!
Pingback: Sunday Snippets
I found your website from the link-up on raisinghomemakers.com. I really like this post and am going to have to give it a try (we use alot of coconut milk)!
I would like to invite you to HomemakingHearts.com on Fridays for a brand new link-up; it would be a delight to have you join us!
Gabriella
Pingback: Fruit Sorbet
Pingback: Fruit Sorbet Recipe
JUST FOUND YOUR WEB SITE LIKE THAT YOU POST WHERE YOU CAN PURCHASE THE ITEMS YOU USE VERY HELPFUL THANK YOU
You’re welcome:)
Pingback: Peppermint Milk Shake (dairy free option)
Pingback: Grain Free German Pancakes (coconut flour & arrowroot)
Pingback: Make Your Own Quinoa Milk - |Non Toxic Living|Work From Home|Mompreneur|Hannah Hepworth|
Pingback: Pear Citrus Green Smoothie - |Non Toxic Living|Work From Home|Mompreneur|Hannah Hepworth|Kefir|Anxiety